Control and presentation of sound in different scales is a distinguishable feature of computer music. In this context, scale does not refer to a group of notes in different pitches, like a C major scale. It instead refers to proportions, as in big vs. small, long vs. short, and few vs. many. Music technology is capable of rendering a single musical idea in extreme proportions, and the collection of those sounds could become a composition.
I will demonstrate a scale-based electronic music composition process with Control Click, a sound installation composed in 2016. The piece is an 11-minute site-specific work for eight or more computers, creating an arcade-like environment with electronic blips and blinks. The computers are networked to play the same SuperCollider file, functioning as both a performer and a lighting device. The video below is a version of Control Click presented at the 2016 Third Practice Electroacoustic Music Festival.
Sound Design With Proportions
Featuring various scales/proportions in computer music means applying different values to a control parameter. If one can control the pitch of an electronic instrument, experiment with low Hz and high Hz. If the duration of a note in an electronic instrument could be programmed, make very short and very long sounds. The keyword here is extreme. A computer is capable of following laborious or precise instructions that are difficult or impossible for humans to execute.
In Control Click, each computer algorithmically generates a melodic line based on a chord. I cannot control the exact sequence of pitches, but I could control the chord type, note duration, and tempo. The range of note duration and their playback pace is wider than that of acoustic instruments, thus capable of creating different timbres and moods. The audio example below plays the melodic line in normal, slightly longer, and very short note durations.
By playing the melodic line heard above with very long note duration and decelerating tempo, I could create the sound below. Note that the tremolo of individual notes reveals more as the note duration becomes longer. Longer and stacked notes with different tremolo rates create a sense of a chord with long reverb.
The sound heard above was inspired by the FFT time-stretching technique, which inspired composers to discover hidden sounds too short to be heard and appreciated in an audio file. The technique can also make a long audio phrase so short that one cannot identify the pitch. In other words, time-stretching scales the duration parameters in extreme proportions. But such an idea is applicable beyond FFT. The audio below is how I applied the duration/tempo scale to the percussion sound.
Composition With Proportions
The idea of applying different proportions can also be applied beyond parameter change. In Control Click, the example sounds in the previous section are meant to be played by multiple computers. But as a site-dependent piece with random number generators, each computer emits a distinguishable note sequence at different physical locations. My goal was to create a sonic environment of an arcade from my childhood – chaotic, overwhelming, and delightful.
Links below point to the moment in the piece that uses previously mentioned scaling examples in an ensemble format.
- The normal melodic line with percussion (1:30)
- Long note duration (2:30-2:50)
- Short note duration (5:30-6:00)
- Extreme extension of note duration and tempo (8:50-10:00)
In the third link, Long note duration, the melodic line is detuned by a random amount at synced timings. The effect of one computer doing so is not so noticeable. But when multiple computers are out of tune in a large space, it creates an impact that I cannot recreate in a concert hall.
Notation of Proportions
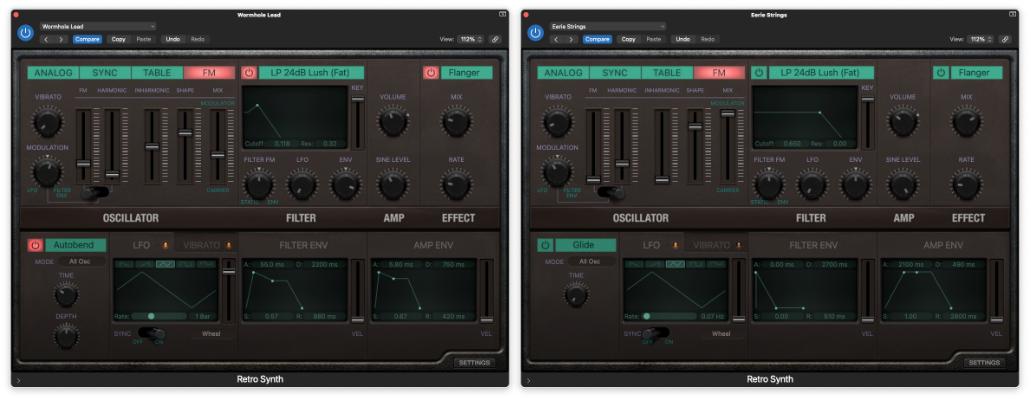
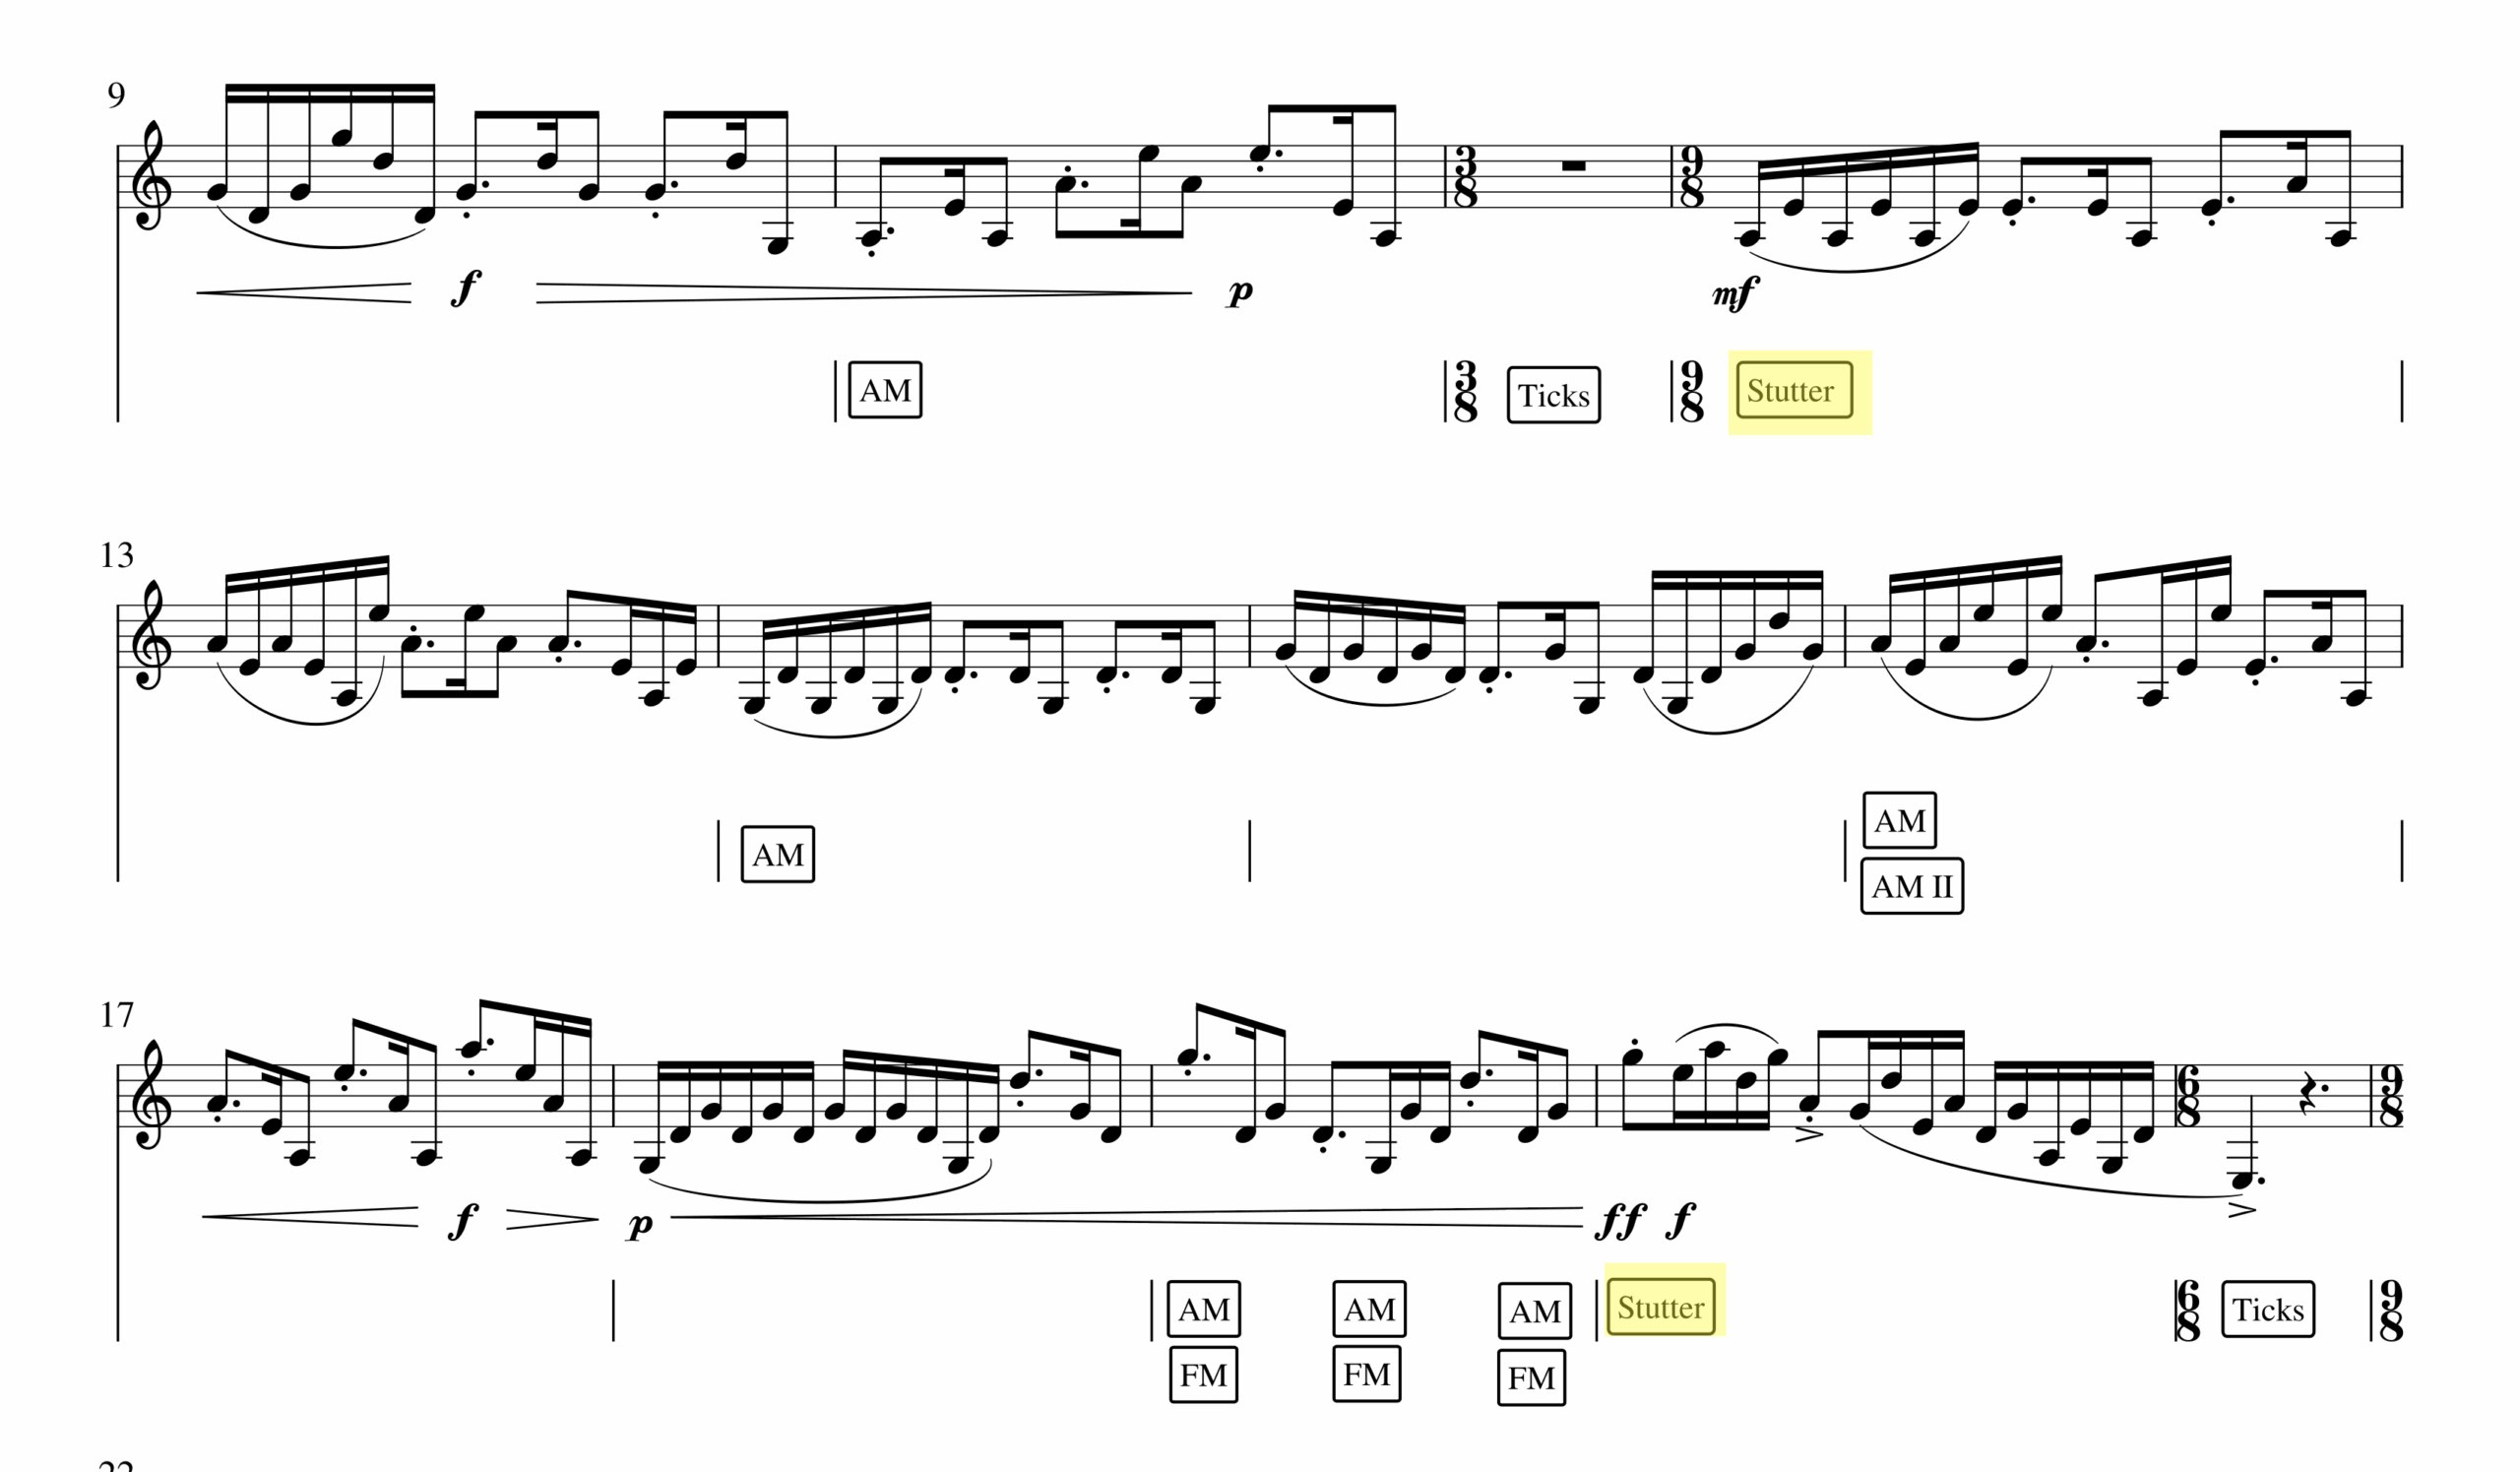
The concept of controlling a range and scope of musical parameters, rather than instructing specific notes to play, is transferable to human performance. A proper notation to play an electronic instrument within a limited range can be considered as proportional control of choices. Seven Bird Watchers (2019) for drum machine ensemble is an example.
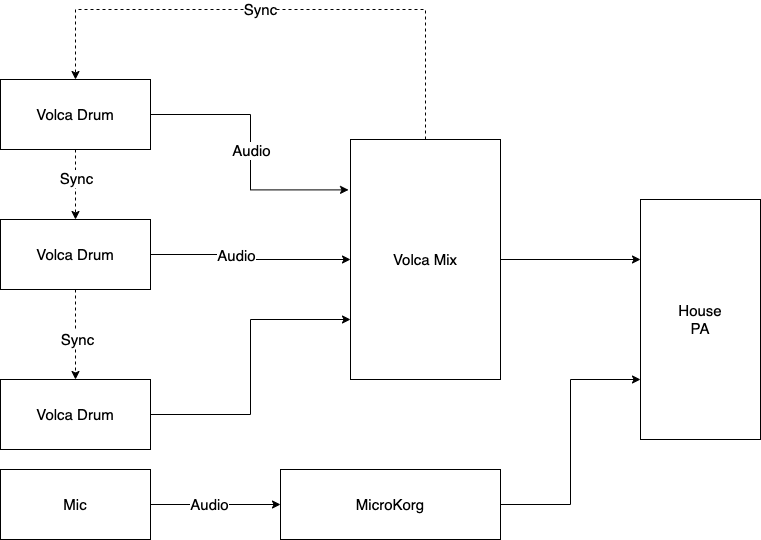
Seven Bird Watchers uses drum machines with customized sync tracks, and the sync track defines the form—the piece is simply seven sections with an increase in tempi and sonic range. While the composed sync track holds Korg Volca Beats’ tempo together, the human performers change the drum machine’s parameters according to the score. The score depicts the range of parameters performers can improvise.
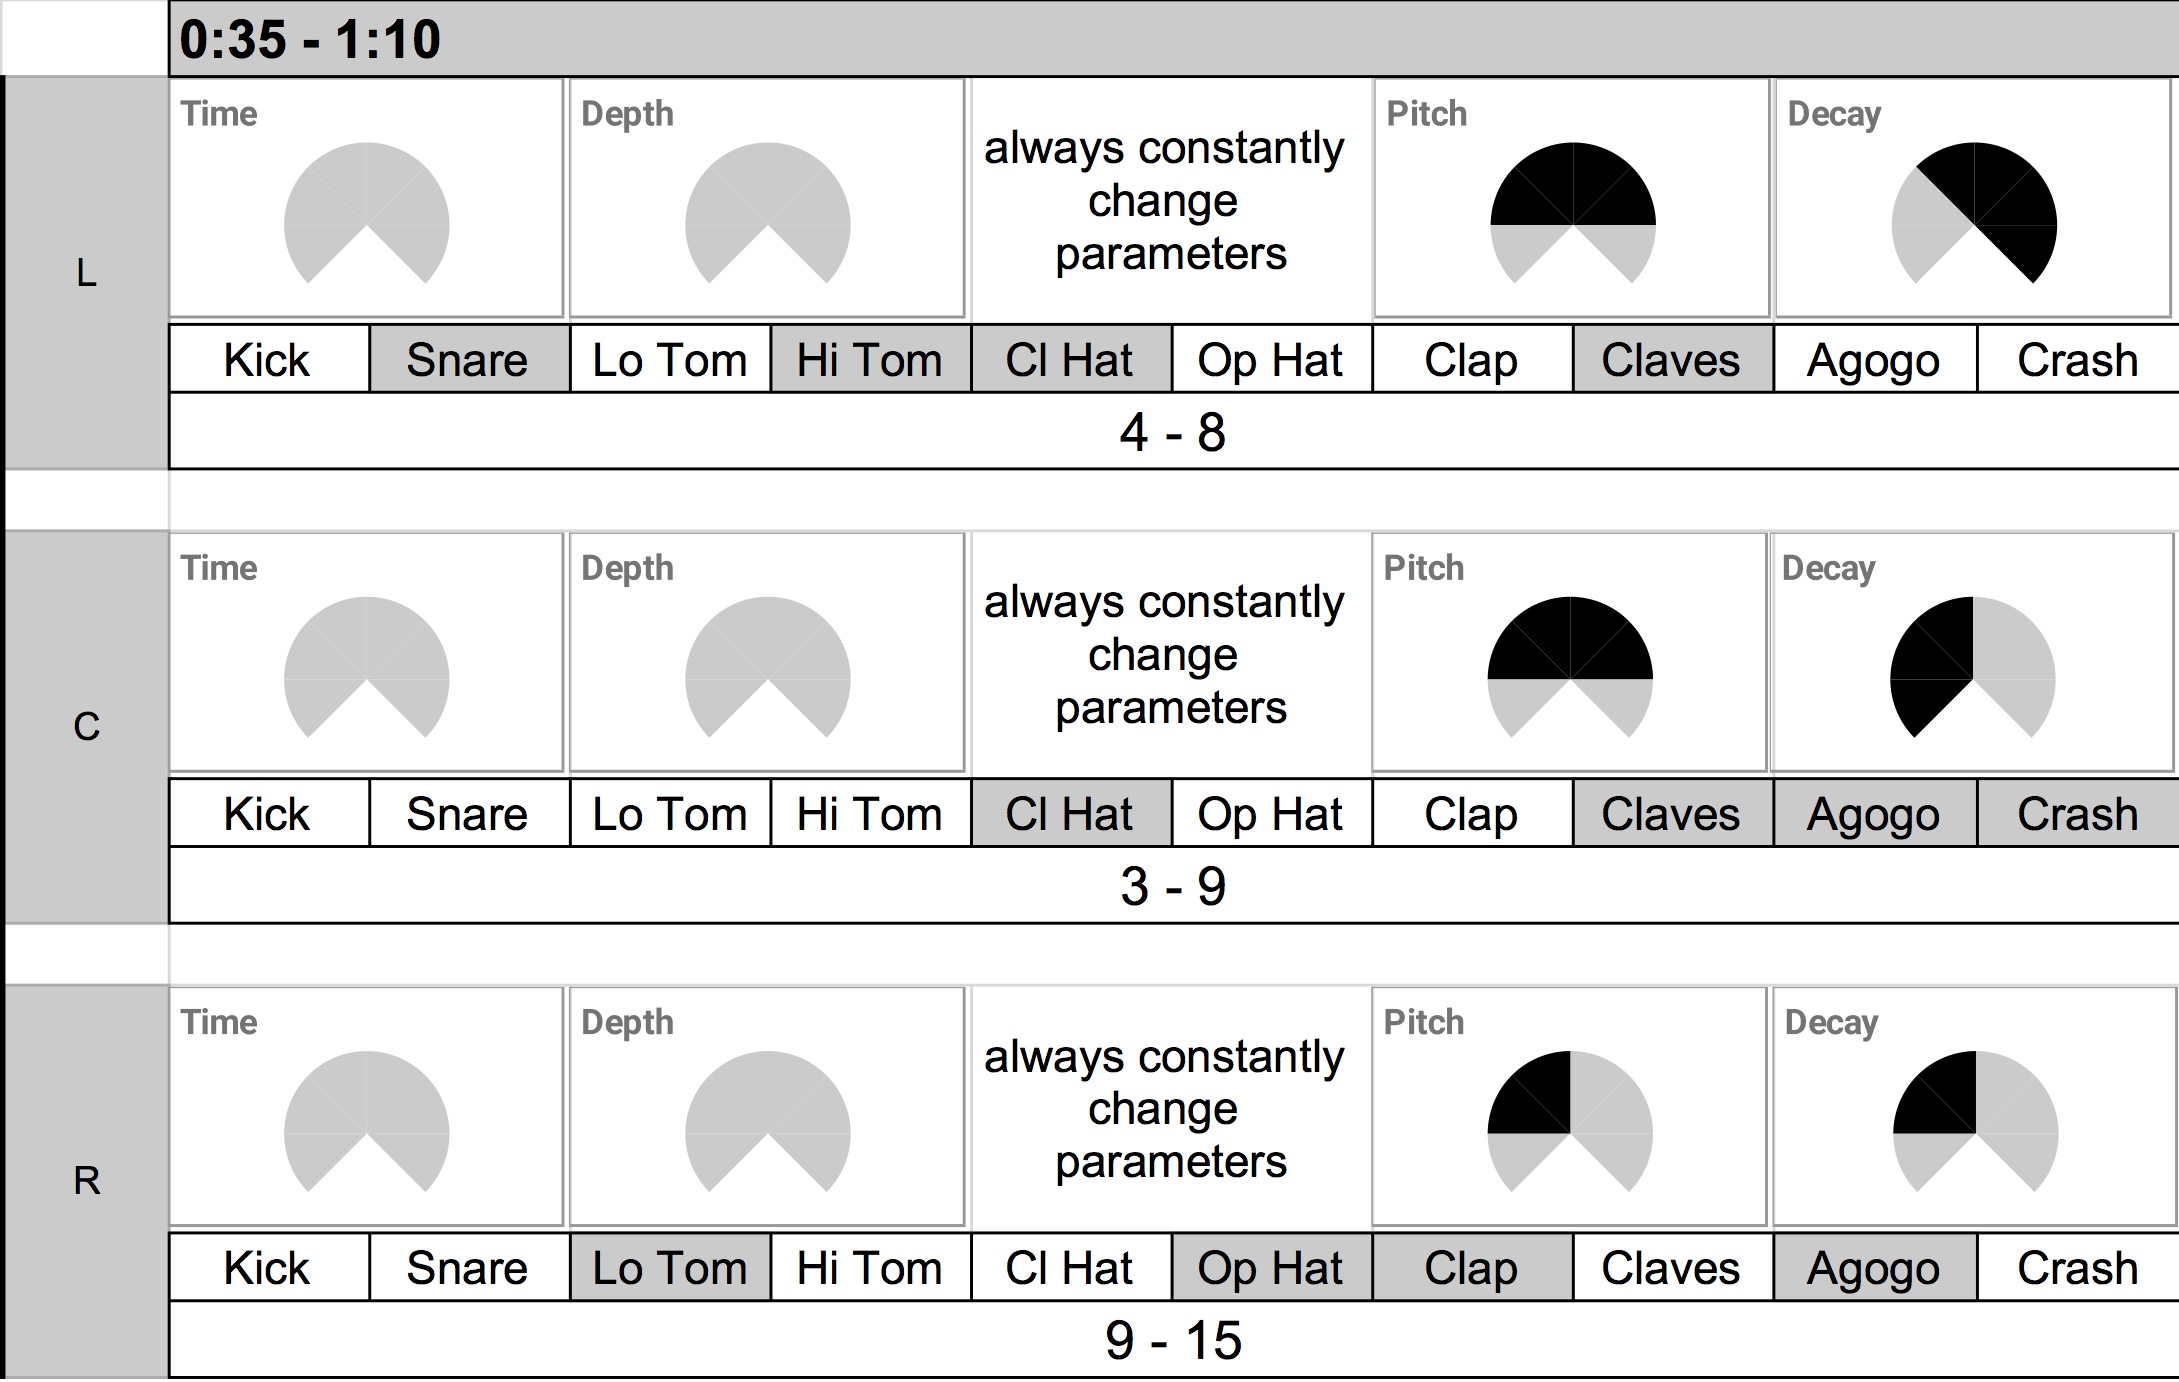
For example, the early section has limited parameter changes and choices. It lasts about 35 seconds with a moderate increase and decrease in tempo. The performers, as shown in the score above, have a very limited choice of parameter change – the dark area of the Time/Depth/Pitch/Decay knobs, as well as the dark areas in the instrument choice, are the areas in which the performers can move or use knobs and buttons in Volca Beats.
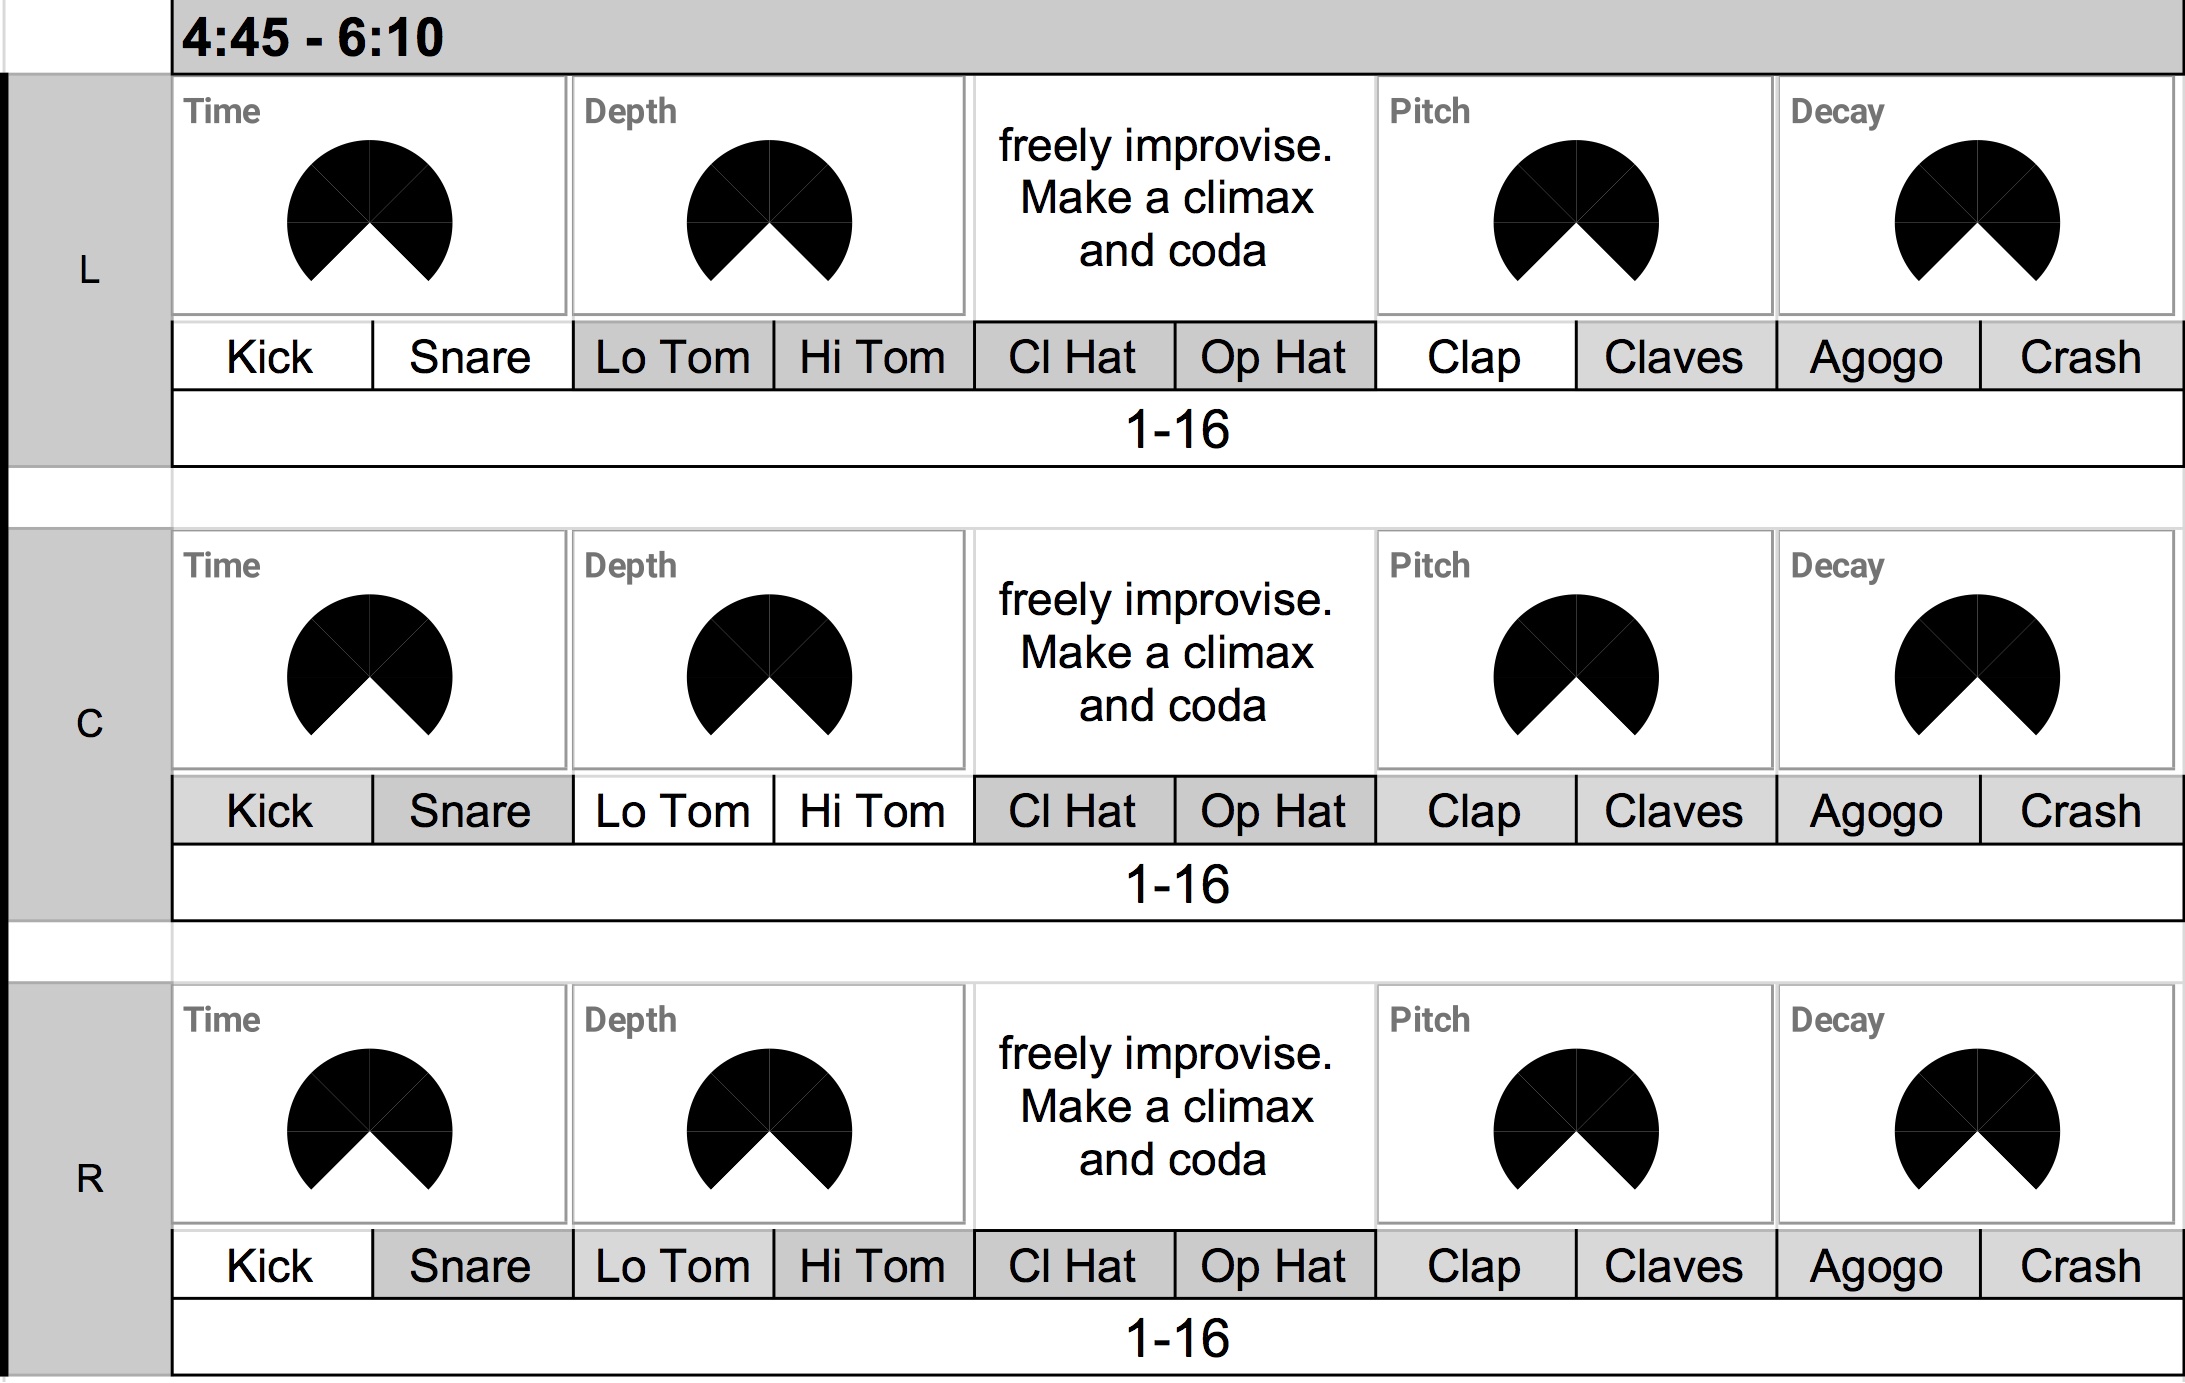
The latter section, in contrast, has a bigger range of tempo changes with an extended duration of 85 seconds. The performers are free to use the entire range of the knobs with almost all available sounds. The proportion of choices and resulting sounds is more varied. For example, the tempo gets so fast that the sixteenth-note run of some percussion instruments loses sense of rhythm. It starts to sound like a bird chirping.
References
For further study, read Curtis Road’s Microsound. I learned the musical application of scale and proportion from this book. Research the scale and proportion in visual art as well. There are ample examples of how different scales make ordinary events extraordinary. Watching a movie on a big screen feels different than watching it on a phone screen. A slow-motion video effect is fun. Similarly, a sound with varying time scales and contrasting parameter values fascinates me.
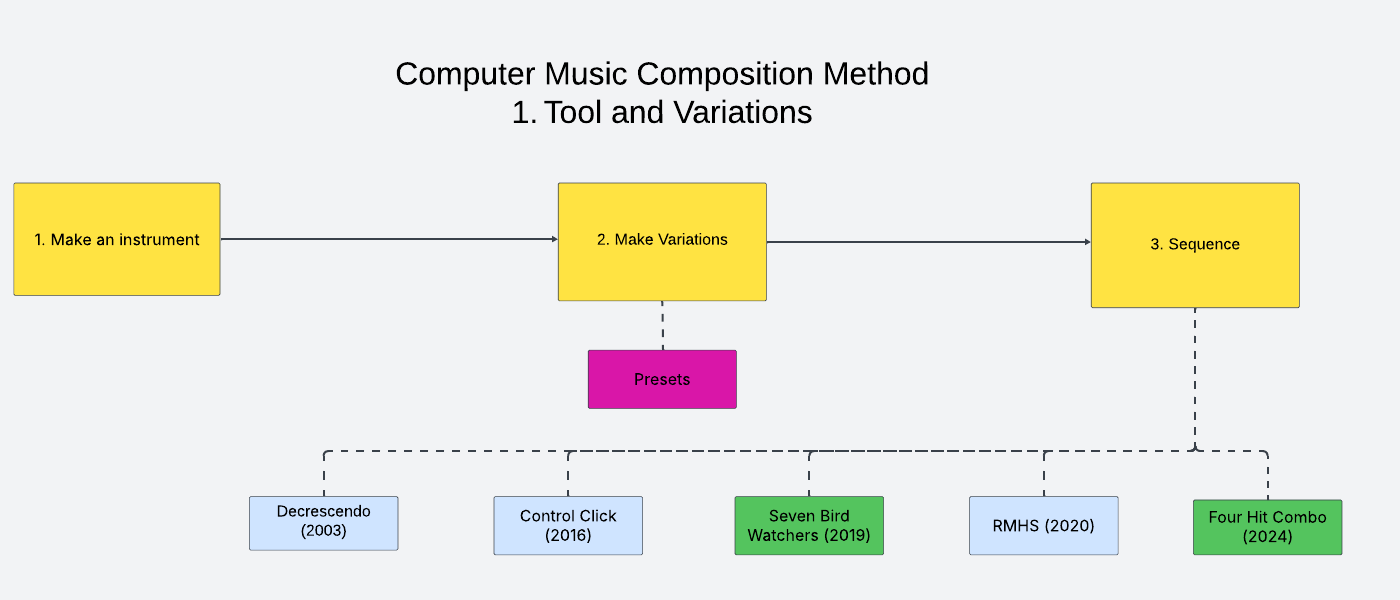
Computer Music Composition Method has other related entries. Read them if interested